

IMPORTANT: This is the old version of the tools. The new version is available here: https://flightsim.to/file/26245/google-earth-decoder-optimization-tools-gedot-blender-addon as a Blender addon
TUTORIAL VIDEO: OjO made a great tutorial to create photogrammetry sceneries with the MSFS decoder, and my optimization tools. Feel free to have a look here: https://youtu.be/6fgTxEh_x84 and https://youtu.be/yRE37NAgwiA (for the merge_sceneries.py script)
IMPORTANT: for the merge_sceneries script to work properly, the source scenery and the destination scenery must share the same min LOD (17 here). The reason is that the min LOD determines the size of the tiles, and the size of the tiles from the source scenery must be the same as the one from the destination scenery.
Python blender scripts designed to be used with Google Earth Decoder Tool sceneries (https://github.com/Thalixte/Google-Earth-Decoder-optimisation-tools).
1) Presentation:
The archive contains four python scripts:
- scenery_optimisation.py: optimize Google Earth Decoder scenery (textures, Lods, CTD fix)
- fix_tiles_altitudes.py: fix wrong tiles altitudes that can occure when moving tiles on the x-y axis
- update_objects_LODs.py: update the LOD levels for the tiles of a scenery based on an array of minsizes
- merge_sceneries: merge all the files from a source Google Earth Decoder scenery to a destination Google Earth Decoder scenery
The scripts are intended to be used with a Google Earth Decoder min LOD of 17. I did not test them with another Google Earth Decoder minLod.
2) Prerequisites:
- Blender 2.83 (https://download.blender.org/release/Blender2.83/blender-2.83.9-windows64.msi). The blender version is important
- Node js (https://nodejs.org/dist/v14.15.1/node-v14.15.1-x64.msi)
- Blender2MSFS Toolkit: https://www.fsdeveloper.com/forum/resources/blender2msfs-toolkit.256/download
- Lily texture Packer IMPORTANT ! download version 1.1.x only: https://gumroad.com/l/DFExj
3) scenery_optimisation script:
3.1) Presentation:
This script applies the CTD issues fix (see https://flightsim.to/blog/creators-guide-fix-ctd-issues-on-your-scenery).
It bakes the tiles texture files in order to reduce the number of the files in the final package, and reduce the scenery loading time.
It fixes an issue with the Google Earth Decoder tool, that breaks the LOD management system.
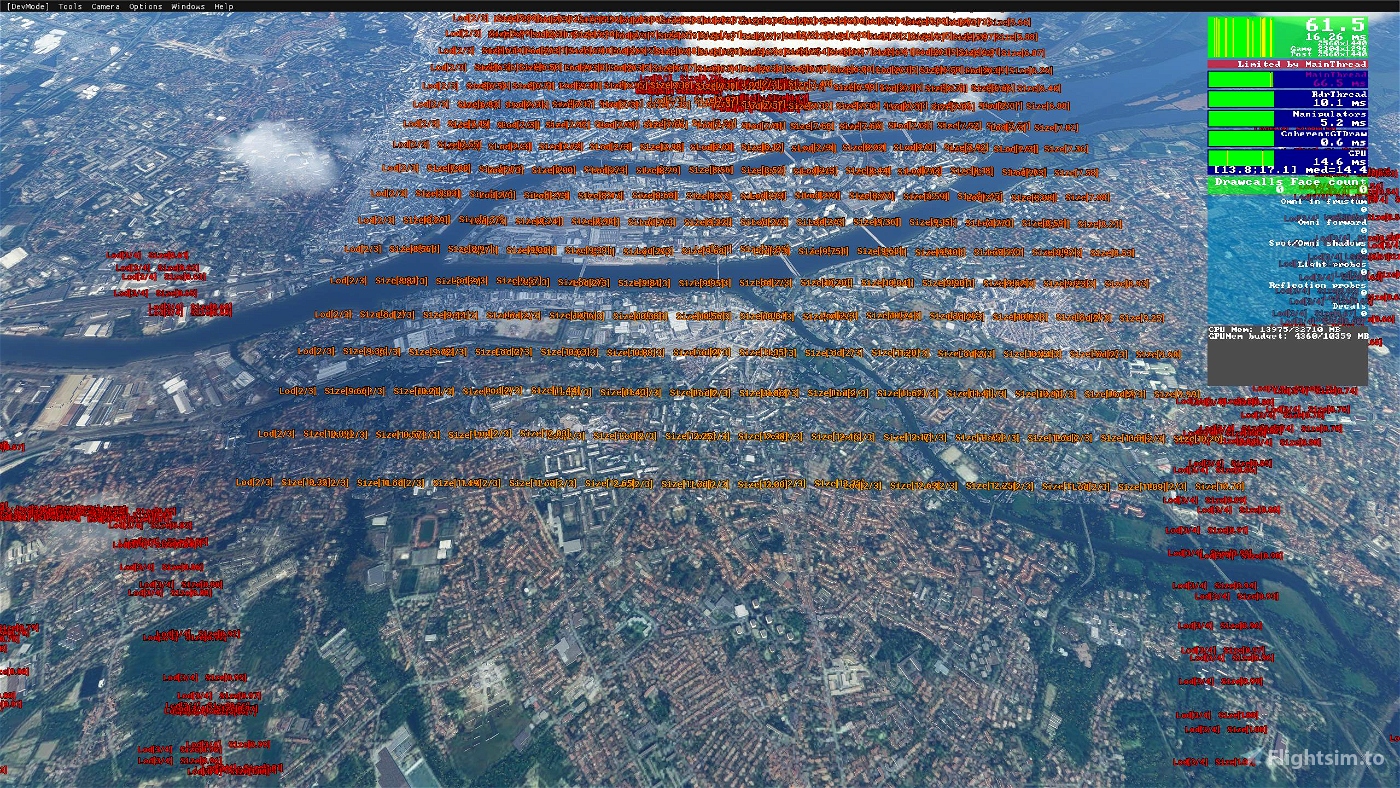
Look at this picture: https://flic.kr/p/2k3YCrd
This picture shows a wireframe representation of a big scenery created from the Google Earth Decoder tool. You can see that the scenery tiles are dark gray, which means there are a lot of vertices on each tile, because all the tiles are on the max level of detail (which is 19 here). The result is that this scene, from this point of view, displays more than 80M of vertices, which bottlenecks the GPU (and the CPU).
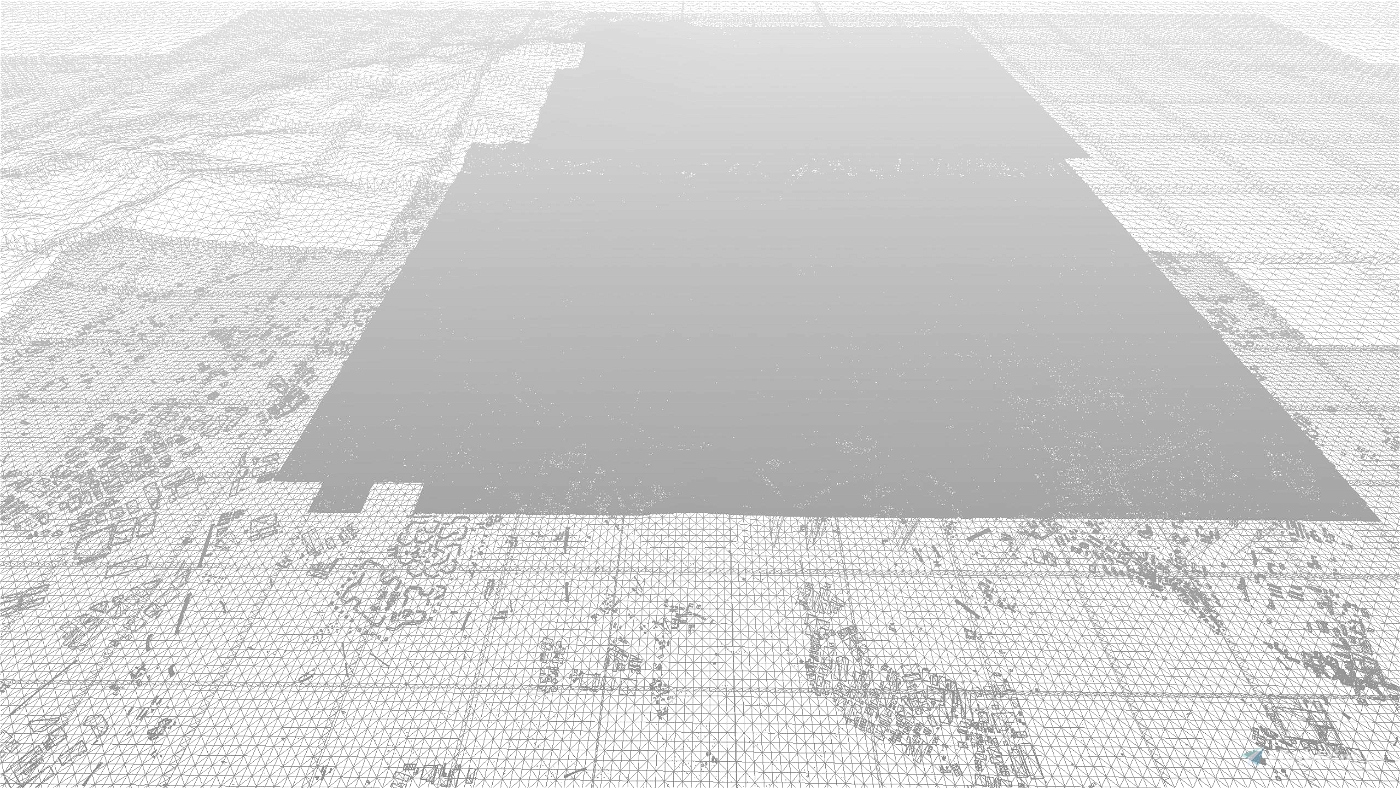
Normally, we should have this: https://flic.kr/p/2kayM52. In this case, we can see that the tiles have the correct LOD levels, and it leads to a reduced number of vertices (20M in this case, but it can be changed according to the LOD levels that are set in the optimisation script (see chap. 3.3 - Configuration)).
The problem here is that the Google Earth Decoder gives all the tiles the same origin, and changes the bounding box to go from this origin point to the last mesh vertice point.
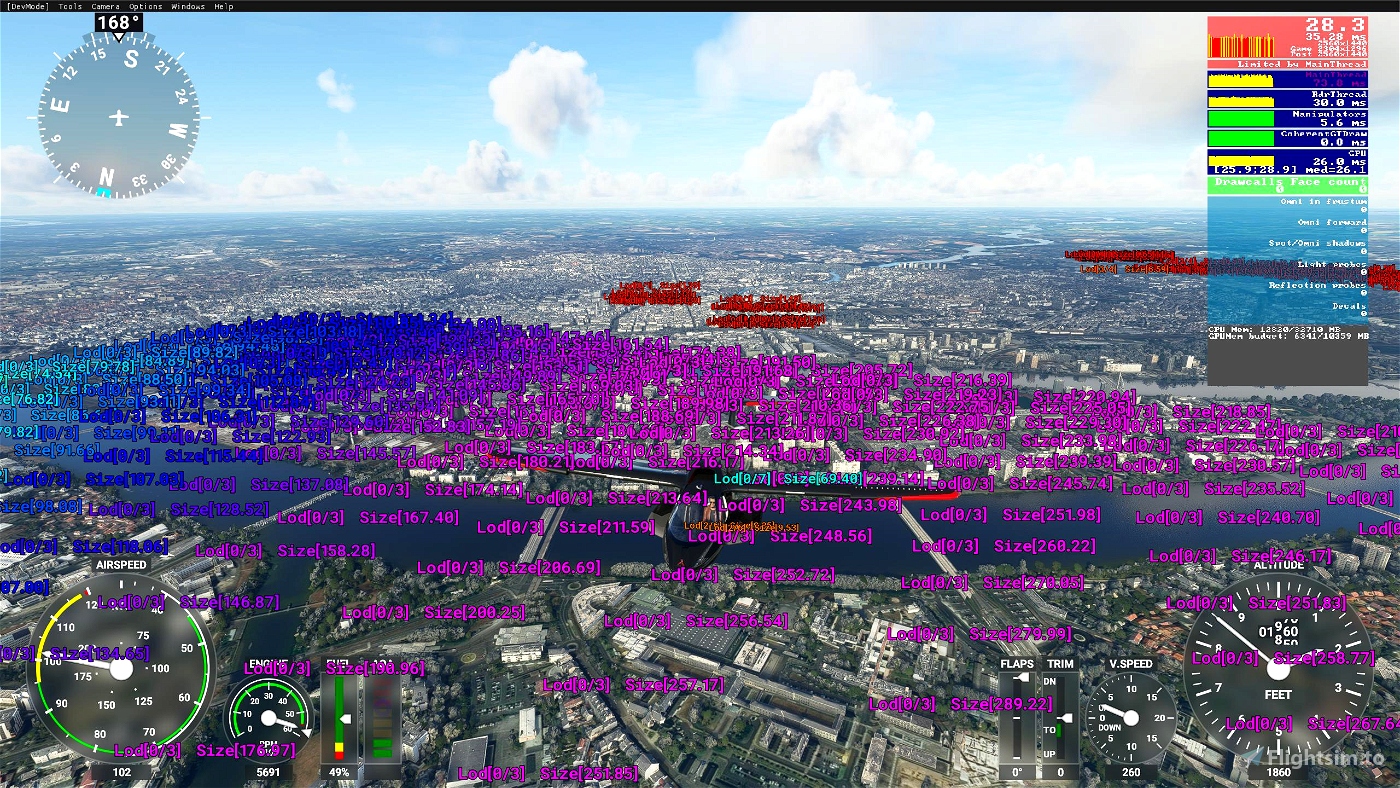
Another way to see this problem, is to use the new MSFS SDK Debug LOD feature, that displays the current lod level of each tiles, and the size of the bounding sphere: https://flic.kr/p/2kautrR
The more the green or blue is the color, the more detailed is the tile. The more the yellow or red is the color, the less detailed is the tile.
Here, we can see that the more detailed tiles are the one that are far from the camera, which is the exact opposite result than the one we want to obtain to optimize our scenery framerate.
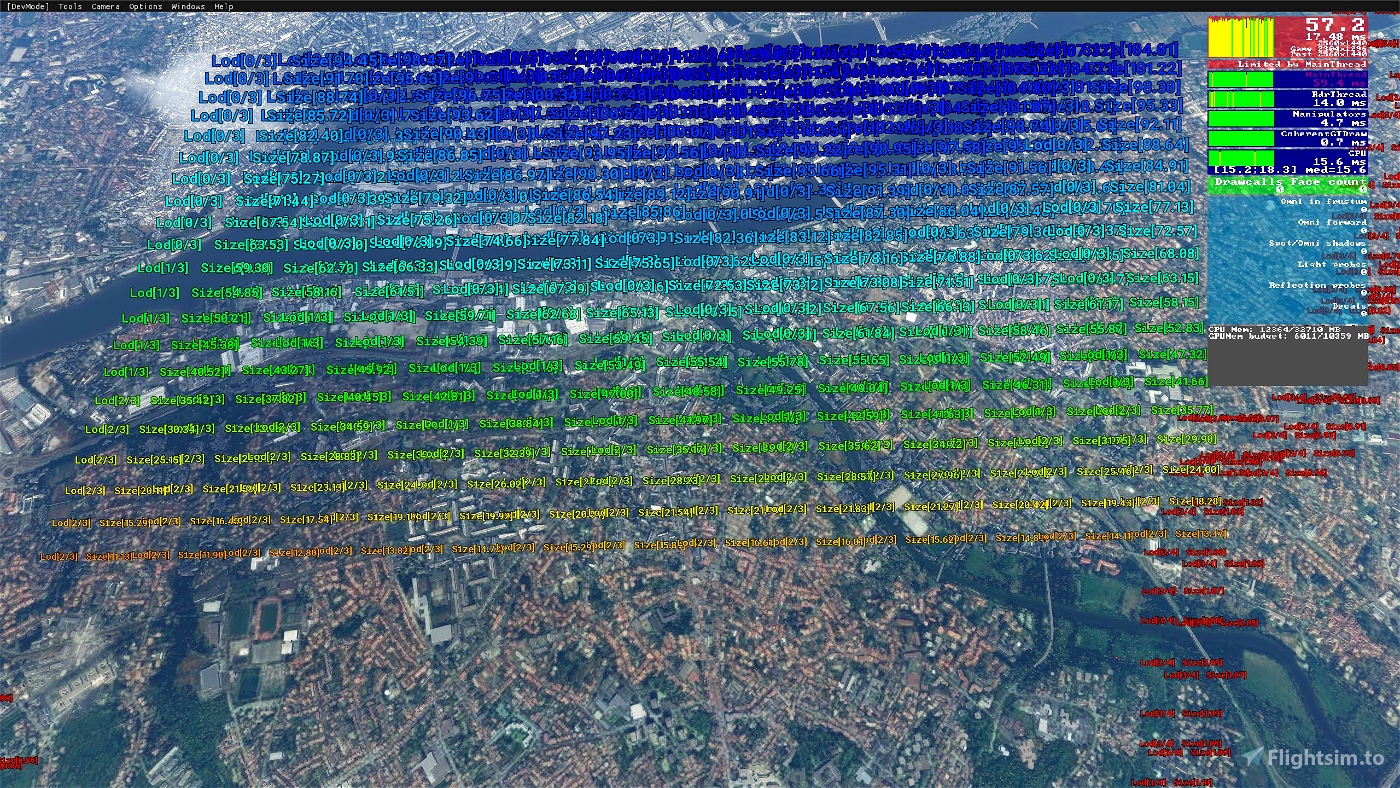
Now, if each tile has its own origin point, and has a bounding box corresponding to the real tile size, we obtain those results: https://flic.kr/p/2kayiyp and https://flic.kr/p/2kayiAo, which are far better from a LOD point of view, and better preserve the framerate.
This is the fix that the script applies to the tiles: it gives each tile its own origin point, and resizes the bounding boxes according to the real tile size.
The script also changes the LOD levels to better suit the LOD management system, and allows (if configured) to convert texture files into jpg format, in order to reduce the texture file size (but with a possible loss in the texture quality).
The script also applies ASOBO extension tags to the gltf files, in order to enable the road management and the collisions. It also fixes texture flickering issues.
The script automatically removes the orphaned scenery object xml files (scenery object xml files that do not have associated gltf and/or bin files)
3.2) Installation:
Just put the scenery_optimisation.py script, and the retrievepos.js script in a folder of your choice.
3.3) Configuration:
Change the following settings, according to your project:
- bake_textures_enabled: tells the script to optimize the textures by baking all the textures corresponding to the min Lod levels of the tiles (default is True). For instance, if you have a gltf file for a tile that is named 30604141705340627_LOD00.gltf, all the texture files corresponding to this tile and this LOD level (all the texture files that start with 30604141705340627_LOD00) will be baked into one single texture
- projects_folder: the parent folder that contains your sceneries
- project_name: the name of your project
- node_js_folder: the folder that contains the node js script that retrieves the Google Earth coords
- fspackagetool_folder: the folder that contains the fspackagetool exe that builds the MSFS packages
- target_lods: an array representing the minsize values per LOD, starting from a minLod of 17 (from the less detailed lod to the most detailed)
- project_file_name: the name of the xml file that embeds the project definition (by default, project_name.xml or author_name+project_name.xml)
- scene_file_name: the name of the xml file that embeds the tile descriptions (by default, objects.xml)
- package_definitions_file_name: the name of the xml file that embeds the package definitions (by default, project_name.xml or author_name+project_name.xml)
- author_name: the name of the author of the scenery
- build_package_enabled: enable the package compilation when the script has finished (default is True)
- output_texture_format: format of the final texture files (values are PNG_FORMAT, JPG_FORMAT, default is PNG_FORMAT)
- JPG_COMPRESSION_RATIO: if you choose the jpg format for the output texture files, indicates the compression ratio
3.4) Usage:
Open Blender in administrator mode.
Go in the Scripting view, then click on the Open icon, and choose the scenery_optimisation python script.
When the configuration is done, open the Blender system console Window (Window => Toggle System Console). Then, run the script.
3.5) Process:
- rename the modelLib folder, in order to fix CTD issues (see https://flightsim.to/blog/creators-guide-fix-ctd-issues-on-your-scenery/)
- if no other backup exists, backup the scenery modelLib files into a backup folder, inside the project folder
- if necessary, install the node Js xhr2 module (npm install xhr2)
- install the PIP and Pillow libraries to allow texture format conversion
- if png texture files output format is selected, convert all remaining jpg texture files to PNG, then remove jpg files
- if jpg texture files output format is selected, convert all remaining png texture files to JPG, then remove png files, and compress all jpg texture files
- retrieve objects positions from Google earth, via the Google Earth API, and put the results in .pos files corresponding to the scenery tiles
- update the tiles position, using those .pos files
- place all tiles objects into corresponding sub folders, in order to group the objects corresponding to the same tile
- update the LODs of the scenery tiles, according to the target_lods defined in the configuration settings
- optimize the tiles, by baking the textures corresponding to LOD levels of the tiles, and by changing the bounding box of the tiles, in order to optimize the LODs
- applies ASOBO extension tags to the gltf files, in order to enable the road management and the collisions
- fix gltf doublesided attributes, in order to remove texture flickering issues
- removes the orphaned scenery object xml files (scenery object xml files that do not have associated gltf and/or bin files)
- automatically rebuild the scenery package, if the MSFS SDK is correctly installed, and MSFS 2020 is not running
4) fix_tiles_altitudes script :
4.1) Presentation:
This script applies the CTD issues fix (see https://flightsim.to/blog/creators-guide-fix-ctd-issues-on-your-scenery/).
When using the scenery_optimisation script, there are chances that the resulting tiles are slightly decaled in the x and/or y axis.
This decal can easily be fixed by going into the MSFS SDK, open the project, click on the "Save scenery..." button to order the scenery objects by type, then select all the tiles (not the lights, rectangles or polygons, just the tiles) and move them to the appropriate location. But this move can break some tiles altitude.
To fix it, save your scenery after moving the tiles to their appropriate location, then close your project and MSFS 2020, and run the fix_tile_altitudes script. Once the script has finished running and rebuidling your project, reopen the project in the MSFS SDK. The tiles position and altitude should now be correct.
4.2) Installation:
Just put the fix_tile_altitudes.py script, and the retrievepos.js script in a folder of your choice.
4.3) Configuration:
Change the following settings, according to your project:
- projects_folder: the parent folder that contains your sceneries
- project_name: the name of your project
- node_js_folder: the folder that contains the node js script that retrieves the Google Earth coords
- fspackagetool_folder: the folder that contains the fspackagetool exe that builds the MSFS packages
- project_file_name: the name of the xml file that embeds the project definition (by default, project_name.xml or author_name+project_name.xml)
- scene_file_name: the name of the xml file that embeds the tile descriptions (by default, objects.xml)
- package_definitions_file_name: the name of the xml file that embeds the package definitions (by default, project_name.xml or author_name+project_name.xml)
- author_name: the name of the author of the scenery
- build_package_enabled: enable the package compilation when the script has finished (default is True)
- fix_with_googleEarthDecoder_data: if set to True, tells the script to use the backup of the old objects.xml data (the one produced by the Google Earth Decoder tool) to fix tiles altitude. If set to False, tells the script to directly retrieve tiles altitude from the Google Earth API (default is True)
4.4) Usage:
Open Blender in administrator mode.
Go in the Scripting view, then click on the Open icon, and choose the fix_tile_altitudes python script.
When the configuration is done, open the Blender system console Window (Window => Toggle System Console). Then, run the script.
The fix comes with two methods: the default one uses the backup of the old objects.xml data (the one produced by the Google Earth Decoder tool)the other method tries to retrieve the altitude directly based on the Google Earth data (using the Google Earth API)
4.5) Process:
- rename the modelLib folder, in order to fix CTD issues (see https://flightsim.to/blog/creators-guide-fix-ctd-issues-on-your-scenery/)
- if necessary, install the node Js xhr2 module (npm install xhr2)
- retrieve objects positions from Google earth, via the Google Earth API, and put the results in .pos files corresponding to the scenery tiles
- update the tiles altitude, using the backup objects.xml file, if fix_with_googleEarthDecoder_data is set to True, or using the .pos files generated by the Google Earth API, if fix_with_googleEarthDecoder_data is set to False
- automatically rebuild the scenery package, if the MSFS SDK is correctly installed, and MSFS 2020 is not running
5) update_objects_LODs script:
5.1) Presentation:
This script applies the CTD issues fix (see https://flightsim.to/blog/creators-guide-fix-ctd-issues-on-your-scenery/).
This script automates the process of changing the LOD levels for all the tiles of a scenery.
5.2) Installation:
Just put the update_object_LODs.py script in a folder of your choice.
5.3) Configuration:
Change the following settings, according to your project:
- projects_folder: the parent folder that contains your sceneries
- project_name: the name of your project
- target_lods: an array representing the minsize values per LOD, starting from a minLod of 17 (from the less detailed lod to the most detailed)
- fspackagetool_folder: the folder that contains the fspackagetool exe that builds the MSFS packages
- project_file_name: the name of the xml file that embeds the project definition (by default, project_name.xml or author_name+project_name.xml)
- scene_file_name: the name of the xml file that embeds the tile descriptions (by default, objects.xml)
- package_definitions_file_name: the name of the xml file that embeds the package definitions (by default, project_name.xml or author_name+project_name.xml)
- author_name: the name of the author of the scenery
- build_package_enabled: enable the package compilation when the script has finished (default is True)
5.4) Usage:
Open Blender in administrator mode.
Go in the Scripting view, then click on the Open icon, and choose the update_object_LODs python script.
When the configuration is done, open the Blender system console Window (Window => Toggle System Console). Then, run the script.
5.5) Process:
- rename the modelLib folder, in order to fix CTD issues (see https://flightsim.to/blog/creators-guide-fix-ctd-issues-on-your-scenery/)
- update the LOD levels for each tile in the tile_object_name.xml files
- automatically rebuild the scenery package, if the MSFS SDK is correctly installed, and MSFS 2020 is not running
6) merge_sceneries script:
6.1) Presentation:
This script applies the CTD issues fix (see https://flightsim.to/blog/creators-guide-fix-ctd-issues-on-your-scenery/).
This script automates the process of merging a Google Earth Decoder source scenery into another Google Earth Decoder scenery.
6.2) Installation:
Just put the merge_sceneries.py script in a folder of your choice.
6.3) Configuration:
Change the following settings, according to your project:
- projects_folder: the parent folder that contains your sceneries
- src_project_name: the name of the scenery that you want to include in the final scenery
- dest_project_name: the name of the final project that should include both sceneries
- fspackagetool_folder: the folder that contains the fspackagetool exe that builds the MSFS packages
- src_project_file_name: the name of the xml file that embeds the source project definition (by default, src_project_name.xml or author_name+src_project_name.xml)
- dest_project_file_name: the name of the xml file that embeds the destination project definition (by default, dest_project_name.xml or author_name+dest_project_name.xml)
- src_scene_file_name: the name of the xml file that embeds the tile descriptions (by default, objects.xml) for the scenery that you want to include in the final scenery
- dest_scene_file_name: the name of the xml file that embeds the tile descriptions (by default, objects.xml) for the final project that should include both sceneries
- src_package_definitions_file_name: the name of the xml file that embeds the source package definitions (by default, src_project_name.xml or author_name+src_project_name.xml)
- dest_package_definitions_file_name: the name of the xml file that embeds the destination package definitions (by default, dest_project_name.xml or author_name+dest_project_name.xml)
- author_name: the name of the author of the scenery
- build_package_enabled: enable the package compilation when the script has finished (default is True)
6.4) Usage:
Open Blender in administrator mode.
Go in the Scripting view, then click on the Open icon, and choose the update_object_LODs python script.
When the configuration is done, open the Blender system console Window (Window => Toggle System Console). Then, run the script.
6.5) Process:
- rename the modelLib folder, in order to fix CTD issues (see https://flightsim.to/blog/creators-guide-fix-ctd-issues-on-your-scenery/)
- backup the modelLib files of the final project that should include both sceneries, into a backup subfolder, so called merge_sceneries
- copy all the xml files, gltf files, bin files and texture files from the source scenery to the destination scenery, overwritting the existing ones
- update the destination scenery scene xml file (objects.xml by default) to change the tiles guid corresponding to the source scenery tiles
- add the guid for the source tiles that does not exist in the destination scenery
- automatically rebuild the scenery package, if the MSFS SDK is correctly installed, and MSFS 2020 is not running
7) clean_package_files script:
7.1) Presentation:
This script applies the CTD issues fix (see https://flightsim.to/blog/creators-guide-fix-ctd-issues-on-your-scenery/).
This script automatically removes unused package files (.gltf, .bin and texture files), aka the files that are linked with tiles that have been removed from the scene. It appears that, if this cleaning is not done, the resulting package keep those files.
7.2) Installation:
Just put the clean_package_files.py script in a folder of your choice.
7.3) Configuration:
Change the following settings, according to your project:
- projects_folder: the parent folder that contains your sceneries
- project_name: the name of your project
- fspackagetool_folder: the folder that contains the fspackagetool exe that builds the MSFS packages
- project_file_name: the name of the xml file that embeds the project definition (by default, project_name.xml or author_name+project_name.xml)
- scene_file_name: the name of the xml file that embeds the tile descriptions (by default, objects.xml)
- package_definitions_file_name: the name of the xml file that embeds the package definitions (by default, project_name.xml or author_name+project_name.xml)
- author_name: the name of the author of the scenery
- build_package_enabled: enable the package compilation when the script has finished (default is True)
7.4) Usage:
Open Blender in administrator mode.
Go in the Scripting view, then click on the Open icon, and choose the clean_package_files python script.
When the configuration is done, open the Blender system console Window (Window => Toggle System Console). Then, run the script.
7.5) Process:
- rename the modelLib folder, in order to fix CTD issues (see https://flightsim.to/blog/creators-guide-fix-ctd-issues-on-your-scenery/)
- browse the scenery object xml files in the object folder
- check the presence of the corresponding guid in the scene xml file
- if the guid is not found in the scene xml file, remove the files associated with this scenery object xml file (.gltf, .bin, and texture files), in order to reduce the resulting package size
- if files are associated to a LOD that is not used in the .xml files, those files are now removed
8) compress_built_package script:
8.1) Prerequisites:
- This script uses the Compressonator tool from GPUOpen. You can download it here: https://github.com/GPUOpen-Tools/compressonator/releases/download/V4.1.5083/CompressonatorCLI_x64_4.1.5083.exe
- it only works on already built package. So be sure to have built your package correctly first. The package should be in the folder <path_to_projects\project_name\Packages> folder
8.2) Presentation:
This script automatically compress DDS texture files from an already built package by applying the DXT1 compression (special thks to Archer374 for suggesting me this possible optimization). It can remove transparency component from the textures, but since Google Earth tiles do not use it, as far as i know, it is lossless.
8.3) Installation:
First, install the compressonator tool in the folder of your choice. Then, put the clean_package_files.py script in a folder of your choice.
8.4) Configuration:
Change the following settings, according to your project:
projects_folder: the parent folder that contains your sceneries
project_name: the name of your project
compressonatortool_folder: the folder that contains the compressonator exe (compressonatorcli.exe) that convert and compress the DDS texture files of the packages. This exe shoud be in the <path_to_compressonator\bin\cli> folder
author_name: the name of the author of the scenery
NB_PARALLEL_TASKS: number of parallel instance of compressonator running at the same time. If you experiment issues running the script, try lowering this setting
8.5) Usage:
Open Blender in administrator mode.
Go in the Scripting view, then click on the Open icon, and choose the clean_package_files python script.
When the configuration is done, open the Blender system console Window (Window => Toggle System Console). Then, run the script.
8.6) Process:
- browse the built package for DDS files in the folder
- convert all DDS files to temporary BMP files
- convert and compress all BMP files to DXT1 format DDS files, in order to reduce the resulting package size
- remove temporary BMP files
If you want to donate, you will always be welcome to help me continue with more projects and update the existing ones https://paypal.me/Thalixte.


Hello derekhe.
I was thinking at a way to make your program do manual Caches using MFS.
I wrote already this once and the site delete everything because I clicked out of the comment window so I will try again but I will be more short.
So the way I thought it could work is like this:
Your program has two features:
So how about you add a new option that Forces an LOD? For example LOW MEDIUM HIGH and ULTRA. ULTRA would be your "High LOD from now" and HIGH would be HIGH from MFS Manual Cache.
Also a way to rename the folders with cached files by the user and make them not to auto delete by your program
And here is how it will work:
A warning should be shown to user that the data can be very large. Like 20GB or more for a 3000 squared miles area.
===========
Another option would be that your program downloads normally the LOW LOD ass asked by MFS and saves the last session and after that it analyzes the area and presents the surface area and the estimated download size for user. And then user can activate a final option to download HIGH or ULTRA LOD for that particular Area. Even with MFS now shut down.
Would it be possible?
Also a question. Is your program now limited to 20GB max size of the cache? It seems its not passing over 20GB even if I set it to 30.
2 years ago
zaelu
2 years ago
Hey, that's the limitations of the photogrammetry ! You can use 21 or 22 to get more detailed tiles, but it wil not work, as you will have too big iles, and the MSFS engine will not be able to render them (too much vertices).
2 years ago
Thalixte
toshie27
Stopped on Line 74 "from bpy.app import binary_path_python" while running script. What can I do?
2 years ago
Have you downloaded the last version ? Otherwise, try to run blender as an administrator
2 years ago
Thalixte
Comonsys
Right now, I'm frequently got an error message of "Google has blocked the request https://kh.google.com/rt/earth/BulkMetadata/pb=!1m2!1s!2u874". On the first time, I waited for 24 hours to get unblocked from google. But after a couple of hour usage, I got the same error message again - blocked by google. This time, I waited 48 hours to get unblocked. Now, I'm waiting on the 3rd time block from google. 48 hours passed already, I'm still blocked by google. Does anyone have any experience on how to get rid of this annoying block from google?
2 years ago
He says in the video that if you download an area of more than 1500 tiles, then Google might block you for a few hours, so you should only download a smaller area at a time. You can also try turning your router off and on again, and that should give you a new ip adress, so you can use Google again.
2 years ago
johnel34
steveli
Hi, I've been trying to use this today and when I run the script after a few minutes I get an error under 'BAKE TILE TEXTURE FILES' saying AttributeError 'Material' object has no attribute 'msfs_show_road_material'.
and then Python script failed, check message in the system console.
and then in line 1056 it highlights material.msfs_show_road_material = True
Is there something I'm doing wrong? Thanks for any help.
Just to add. I think this might be an issue with Lilly's texture packer rather than your optimisation tools.
2 years ago
Hi. this is because tou have not installed and enabled the gltf2msfs blender addon. I will update a new version of the tools that get rid of this error, and which is more user friendly. Stay tuned ;-)
2 years ago
Thalixte
Mobias
I am using this mod to making photogrammetry scenery and it works very well except one problem with "Lily texture packer":
2 years ago
Hello, and thks for your feedback. As i am not the author of the Lily Texture packer, i cannot totally answer your question. But as far as i am concerned, i did not see any compression algorithm applied on by the addon. It only changes the UV map, and merge all the tile textures into one single file.
2 years ago
Thalixte
steveli
I used this tool with Blender and Earth 2 MSFS when I tried to get some Arizona towns to it's latest, but some towns like Buckeye, Surprise and Goodyear are still with Bing Maps. The State Farm Stadium is still University of Phoenix Stadium while Gila River Arena is still jobing.com Arena. Is there something I can do to fix these?
3 years ago
Hello. Actually, there is no tool available to retrieve Bing maps fata (except in MS/Asobo's side). The author of the Google earth decoder tool told us he would bring the code in github, but he never did it. So there is no opppotunity for the moment to retrieve Bing data easily (and i have not the time to find a way to do it by myself, sorry). Maybe i will ask MS/Asobo if there is a possibility for them to extend their tools, but i don't think they will agree, because of copyright issues, and so son...
3 years ago
Thalixte
James1976
Hello, thx for your scripts, using them i was able to make a photogrammetry scenery of Taranto/Italy (you can find it here in flightsim.to) but i've a problem: texture files are THOUSANDS and the scenery cause a long time for starting FS, so i tried to use Lily texture packer, ..i correctly installed it in Blender addons, but using scenery_optimisation.py or compress_built_package.py, with bake_textures_enabled = True, ..i always get as result the same number of files created in Texture dir. So what i miss? i installed 1.1.3 version of LilyPacker (you wrote 1.1.x is good), must i try to use a different version? Thx in advance!
3 years ago
Wat you have to check is that you have one texture per tile LOD. Depending on the scenery, yes, it can stil be thousands of textures. But compared to the number of textures withour packing them, yoy should have 10x less textures than without it
3 years ago
Thalixte
Kramnik
Hi
I only have 2 small/big questions (for the beginning)
1.) where to put the Lily Texture Packer scripts? Same folder as the Google Earth Optimization scripts?
2.) After (of before?) I run the script.......can I remove unwanted buildings or parts of the import (e.g. to have only a special area with nice borders around (e.g. streets). Cause to area I want to import is never only rectangle....more "something else"...and there is a lot of "junk"around which is not needed/wanted. How can I remove this?
Many greetings from Singapore,
Lutz
3 years ago
1) Lily texture packer script is a blender addon. Download it, go to the addon manager in Blender, and load the archive. Then, once loaded, enable it in Blender.
2) For the area, i answered to you in PM.
3 years ago
Thalixte
Tyrell63
Hello again, I made a new tutorial, this time about the merge_sceneries script.
https://youtu.be/yRE37NAgwiA
3 years ago
Great ! Will add the link. Thks a lot. Just a remark however: the fspackagetool_folder variable is important as it indicates the path to the build exe of the SDK (even if this build exe launch the Flightsimulator exe to really make the build).
3 years ago
Thalixte
OjO
Is there a way to directly connect to Google live instead of this ?
3 years ago
Hello! Can you explain more precisely what you mean ?
3 years ago
Thalixte
kvari
Do you know why this happens ? I've already used (scenery optimization/retrieverspos ) and also (scenery_optimisation/decoder) neither of them recovers the positions. Thanks
https://pasteboard.co/IoqZivhlRqcC.png
3 years ago
Yes. It could be because you have been blacklisted by Google due to too many requests to the api. What are the longitude and latitude in the xml scene file ?
3 years ago
Thalixte
suomy
@Thalixte, thanks for creating and sharing this wonderful tool!
3 years ago
CyberDude
Hello, thanks for the amazing tool. However, is that anyway I can exclude the airport from the google photogrammetry ?
3 years ago
Yes, once youd downloaded and optimize the tiles, go into the dev mode of MSFS, select the tiles corresponding to the airport, and remove them. Then, use terraforming polygons to blend the airport with the rest of the photogrammetry.
3 years ago
Thalixte
MistyEagleGaming
Hello, I made a video tutorial in English that shows how to use the scenery_optimisation script. I hope it's useful!
You find it here: https://youtu.be/6fgTxEh_x84
3 years ago
Wonderful tutorial, very didactic and exhaustive. Just a remark: you can download more tiles from the msfs decoder tools. In my rig, i have 32Gb of RAM, and i can use a rectangle that covers approximatively 15000 data without any problems, with 17-19 Lods. More data can be problematic, but until 15000, it is good.
Also, Thanks for the "snap to ground" trick to correct tile elevation issues when moving them. Never thought about that. I made a specific script for that purpose (fix_tiles_altitude.py), but your tricks seems to make it easier to apply the correction ;-) .
Also, great colorimetry settings for the Benevento scenery. I guess i will try them for some future creations.
I added your video in the description of the tools.
3 years ago
Thalixte
OjO